I have undertaken this as a winter project. The motorcycle for this project is a 2001 Kawasaki ZX-12R with 12,250 miles on it, also known as model A2. The previous owner had noticed a coolant leak, tried to repair it but failed to install proper seals on the oil pump shaft. This caused the coolant to enter the lubrication system and subsequent main bearing failure. With this short story as the background I will describe the process of dis-assembly and re-assembly of the motorcycle.
I did not take the ZX-12R completely apart, only so much as necessary to rebuild the engine, the clutch and place the motorcycle back in operation. However, most of the motorcycle needs to come apart to make removing the engine easier:
- Take off all plastic fairings.
- Set up the motorcycle on the stands, at least on the rear one.
- Remove the seats.
- Remove the fuel tank. I know, the manual calls for propping the fuel tank up. Don’t skimp, remove it, you will be glad you did when the time will come to disconnect and later, to reconnect the engine harnesses. It will also be much easier to remove the fuel hoses, which will have to be done.
- Remove the radiator.
- Loosen the chain.
- Remove the throttle body ducts inside the air filter box (serves as the main motorcycle frame).
- Disconnect the battery. I removed the entire tray and disconnected the starter at the same time.
You have to have a factory service manual. It has too much useful information in it to be able to do this work without it.
I found that the manual, though detailed, covers only dis- and re-assembly of separate systems and is not well structured to show the proper sequence of assembly of the entire engine if it is taken completely apart. Therefore I put together the following to help me stay on track when re-assembling a completely dis-assembled engine.
Before we re-assemble the engine, I assume that the engine is apart as follows:
- Head is off, disassembled, cleaned, valve seals replaced, valves wire-wheel cleaned, carbon removed, valve guides checked for excessive play
- Camshafts are off, checked
- Camshaft cover is checked
- Timing chain is off and checked
- Timing chain tensioners are off, checked
- Valve cover is off, cleaned, reed valves are cleand and ready to re-install or be capped
- Cylinders are off, cleaned, checked for wear
- Crankcase is split, cleaned, all RTV is removed from mating surfaces
- Transmission is removed
- Shifter is removed
- Shift drum, shafts and shift dogs (forks) are removed
- Oil pipes are removed
- Gear position sensors are removed
- Oil pressure sensor is removed, cleaned, ready to re-use
- Oil filter and cooler are removed
- Basically, there are no removable parts left on the crankcase, and the major assemblies (head, cylinders, pistons) are checked out and prepared for re-installation.
- The only thing I did not remove and replace was the needle bearing for the shifter shaft. It is pressed in and hard to remove, and it was in good shape. I washed it with brake cleaner, filled with engine oil and left it alone.
Re-assembly order:
Engine core (cylinders, pistons, head, transmission, crankcase):
- Install breather plate into the upper crankcase half, if removed. I removed it; there was a lot of crud underneath it, I cleaned it out:
- Use silicone sealant between the breather plate and crankcase. I used Permatex Ultra Black, installed bolts finger tight, and torqued the bolts to spec with threadlock 1 hour after installing the plate. This allows the RTV to set and prevents it from squeezing completely out, which would happen if the plate was torqued to spec immediately.
- Use medium strength thread lock on the 5 bolts holding the plate. I used ThreeBond medium strength, high temperature thread locking compound on all fasteners calling for threadlock.
- I have left the breather hose attached to the pipe. I can still place the engine on the bottom flange if the hose is let hang off the edge of the table.
- Install the oil pressure fitting and the oil pressure gauge itself, torque to proper pressure. I used Permatex high temperature thread sealant on the pipe threads of these parts. Conical pipe thread fittings should never be assembled metal-to-metal, sealing tape or paste should be used. I had good success with the Permatex sealant in the past. I would not use Teflon tape on engine fittings.
- Install the oil channel plug into the crankcase wall opposite the oil pressure sensor, if it was removed. Use thread sealant. Mine was not removed.
- Install starter one way clutch.
- Use Moly assembly lube on the shaft and spacer flanges.
- Install torque limiter along with starter clutch.
- Use Moly assembly lube on the shaft and spacer flanges.
- Install new O-ring on the shaft (I used a green HNBR from a kit).
- Install oil spray pipe underneath the breather plate. I used a little thread lock on the pipe clamp holder bolt.
- Install pistons into the cylinders using ring compressors or by hand; pre-requisites:
- Thoroughly clean and lubricate the cylinders, ensure they are not worn, cross hash is visible
- Thoroughly clean the pistons:
- Remove piston rings
- Clean ring grooves
- Install the rings back with ring gaps oriented as required in the manual. Make sure you do not mix up the first and second rings and install them with the right side facing up.
- Ensure that pistons are oriented correctly with the dot on piston facing to the forward of engine.
- Assemble the cylinders and cylinder head onto the upper crankcase:
- Note: the cylinder assembly is held in place by the head bolts. The head and the cylinders install at the same time.
- Check that the alignment dowels are in place between cylinders and crankcase (2 dowels) and the cylinders and head (2 dowels).
- Install the aluminum oil pipe that connects the cylinder body to the head. The pipe has two 7.0 x 2 mm O-rings that should be replaced. I used green HNBR 6.8 x 1.9 mm rings. Do not forget this pipe, it provides lubrication to the camshafts.
- Install a new gasket at the cylinder base.
- Install a new gasket under the cylinder head.
- Note: pistons will not fit into cylinders though the upper crankcase openings and must be installed into the cylinder assembly before it is bolted to the crankcase. Con rods will fit through the cylinders so pistons can be installed from the bottom or from the top. Care should be taken not to damage cylinder walls with dangling con rods.
- Turn the engine upside down, placing thick cardboard under the head and support under the crankcase to keep the oil pan flange level.
- Install main bearing inserts into the upper crankcase half:
- I selected the inserts using telescoping micrometer measurements of the crankcase bores and micrometer measurements of the journals. I needed 4 brown ones and 1 black one. Note that they sell as single pieces, so you need two for a single journal, 10 total.
- Measure the inserts, select pairs to match thickness as best you can.
- Lay similar thickness on the same side of the crankshaft (if you have thin-thick pairs, lay all thin halves into the lower crankcase, all thick ones into the upper crankcase).
- Apply engine oil to the inserts prior to laying the crankshaft into place. If you plan to plastigage the oil clearance, do not use a lot of oil or the plastigage will slip around in the gap.
- Hang the timing chain onto the crankshaft sprocket at this time. The engine is still upside down, so it will dangle into the head opening. You may wish to consider cutting off the timing chain guard tab on the lower crankcase, which will prevent replacement of the timing chain without splitting crankcase if you need to do it in the future. I cut off the guard tab, and it made it very easy to install the chain at any time.
- Lay the crankshaft in place.
- Install rod bearing inserts. I needed all blue, which is the same the engine had from the factory. These also sell as single pieces, so you need 8 total.
- Lubricate both sides of the rod side insert with engine oil and install.
- Lubricate only the journal side of the cap insert with engine oil. Leave the side mating with the con rod cap dry. Install the insert.
- Install con rod caps, torque the nuts until solid contact is made.
- Use new con rod bolts and nuts, they will be torqued to the stretch limit eventually.
- Tab side on the cap faces the same way as the tab side of the con rod, towards the rear of the engine.
- With the crankshaft in place, torque the con rod cap nuts to the specified torque and then the rest of the way, 1/3 of a turn more.
- Torquing the cap nuts may tend to dislodge the crankshaft. I held it in place with one hand and torqued with the other, it worked well.
- Install the transmission.
- Install the semi-circular clips in the crankcase to match the bearing grooves.
- Install bearing index pins into the crankcase.
- Install the driven shaft.
- Install the main shaft.
- Dribble engine oil over the shafts and their bearings, check the shafts for free rotation.
- Install the lower crankcase.
- Make sure the bearing inserts are installed in the lower crankcase half and the tabs are properly aligned. This is the last chance to make sure all bearings are properly installed.
- Lubricate all inserts and journals with engine oil or assembly lube, or mix of both.
- Test fit the crankcase, rotate the transmission shafts and the crankshaft making sure nothing has gone out of alignment.
- Lift off the lower crankcase.
- Use ThreeBond 1207B to seal the flange, applying the bead as described in the manual. I have carefully compared the variety of liquid gaskets available, including Permatex alternatives, and concluded that TB1207B is different from typical silicone RTV in that it has a fairly low viscosity and extremely high elasticity, making it best for high vibration applications. The only Permatex sealant matching TB1207B in characteristics is The Right Stuff. Ultra Copper and Ultra Black have about 30% less elasticity and much higher viscosity, and may create extra clearance between case halves, reducing the preload on bearing inserts. Do not use these for case mating.
- Torque the bolts in the specified sequence, both on the lower and upper sides of the crankcase.
- Wipe out excess TB1207B around the case to prevent dribbles, especially inside the engine.
- Crankcase is now assembled.
- Install the gear position sensor with wiring.
- Install the speedometer sensor with wiring.
Camshafts, timing chain and tensioners:
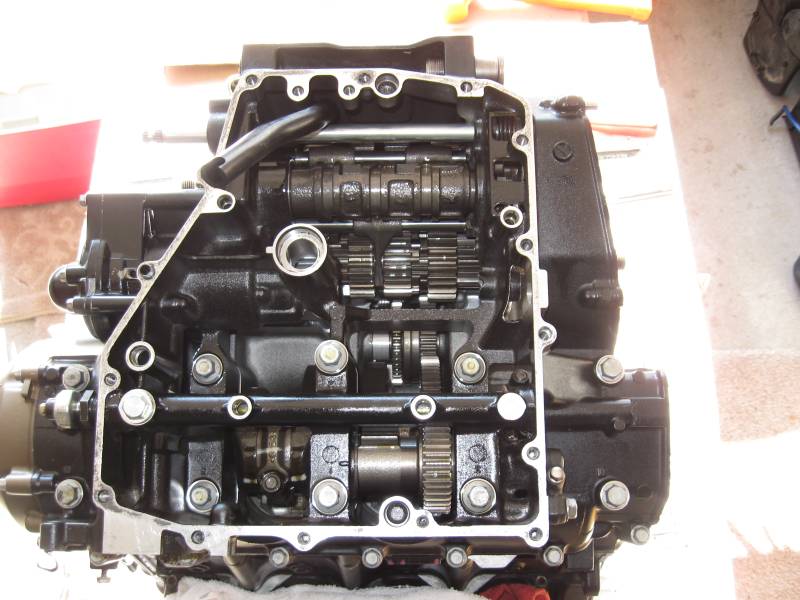
- Turn the engine right side up.
- Install the cam shafts, making sure to install the exhaust and intake shafts on the correct sides of the engine.
- Install the chain onto the sprockets as specified in the manual. The links are supposed to be numbered, so make sure they are on the right teeth. Mine were not, so I numbered them as necessary.
- Install camshaft cap. Note: two of the bolts are longer than the other, their position is marked with small triangles on the camshaft cover plate.
- Install the top chain guard and chain rails.
- Install chain tensioner. Mine, after being reset per the manual, clicked many times more when I placed it and tightened it per specification.
- Install cover seals and valve cover.
- Install reed valve covers. I did not replace the Kleen Air system, instead connecting the two pipes on the reed valve covers with a piece of hose.
Drive shaft side:
- Install the shifter oil seal
- Install output shaft oil seal
- Install oil pump, oil pump drive shaft and the water pump. Remember to install the circlip and washer that limit the axial motion of the shaft.
- I rebuilt my water pump using an OEM seal kit, which is quite inexpensive. It is possible to remove the seal from the old pump but I had to tear the seal apart using sidecutters, it is impossible to knock out because of the glue that holds it in place.
- It is best to use a press to install the seal. I tried using a socket and hammer but the sticky seal would not go in straight. In a press it was a five minute job.
- I packed the oil pump loosely with grease and oil mix to help it prime when the engine is first cranked.
Transmission and clutch side:
- Install the shift drum
- Install shift rods and shift forks (dogs)
- Install bearing holder using a socket head bolt and screw
- Install spring attachment pin
- Install shift drum indexing wheel with spring
- Install shifter shaft with pawl
- Install the oil pipe with O-rings, secure it with the two clips and socket head screws using threadlock.
- Install the clutch (this can be done as a separate task later as well).
- I installed all new steel and friction plates. Steel plates had rough spline edges from the stamping process at the factory. I used a grinder with a polishing wheel to deburr the plates. This will prevent the binding on the clutch drum and poor clutch disengagement. After doing this my clutch spins to a complete stop when riding if the release lever is held pulled for 5-10s.
- I also used a Falicon basket. It is stronger than the stock one. It also has twin ring gears that are spring loaded and bind the flywheel gear to prevent clutch rattling. This split gear makes the basket more difficult to install without the clutch index tool, but you can do it by sliding the basket in part of the way, engaging the first ring gear first, turning the basket a little to align the ring gears and then sliding the basket in the rest of the way.
Final assembly before installing the engine: (until here, the engine could be set flat on the table on the oil pan mounting surface while letting the vent hose hang off the edge)
- Install oil pressure relief valve.
- Install oil intake.
- Install breather pipe bracket onto the edge of the bottom crankcase flange.
- Install oil transfer pipes with O-rings under the oil pan (there are two of those).
- Install the aluminum plug with washer, if removed, onto the crankcase oil tube under the oil pan.
- Install oil pan.
- Install oil level sighting window.
Install the engine into the frame of the motorcycle. It is easy to tilt the engine on the jack, and the tilt will cause the throttle bodies to press against the frame. Take your time and level the engine; once properly leveled it will fit and the mounting holes will line up as they should. Assemble the rest of the motorcycle: engine mounts, exhaust, radiator etc.
The A model ZX-12R (2000 and 2001) has a different crankcase and some parts than the later B (2002 on) models. The differences are:
- Gear shifter diameter is larger on the B model, and the needle bearing and shaft seal are larger, too (14 mm on the B model, 12 mm on the A model);
- Oil pipes are larger in diameter and their heads are 2 mm thicker on B than on A, and their fittings and O-rings are larger;
- Oil pan has shorter retainer posts on the B model, to accommodate the thicker oil pipe heads;
- The oil pump rotor and stator are 2 mm taller on the B model, and the bore in the crankcase is accordingly longer.
All other parts are interchangeable between the A and B model engines.
I have accidentally purchased a B model crankcase for my A model engine. The crankshaft from the A model fits the B model case just fine. The counterbalancer shaft is a different part number in B models but mine A-model one fit, albeit tightly, and worked fine; I adjusted the gear lash later easily once the engine warmed up. I had to buy a B model oil pump, oil pipes, gear shifter shaft and gear shifter oil seal, and ground down the oil pan posts 2 mm to allow the oil pan to close on the thicker oil pipes. These parts are often sold on E-bay as a bunch of “engine hardware”, just check the pictures for the parts you need. Seals are best to buy new to prevent the hassles of oil leaks.
This ZX-12R is now fully functional, I rode it and it runs smoothly, shifts smoothly and is ungodly fast and nimble. I also chose to use the Evans waterless coolant in it as these engines are known to run hot, especially when idling in traffic. I use a Pure One PL14610 filter and either a mineral or synthetic 10w40 motorcycle oil in it.